
Do-It-Yourself (DIY) projects are a fantastic way to unleash your creativity, save money, and add a personal touch to your home. Whether you’re a seasoned crafter or a curious beginner, there’s a DIY project out there for everyone. Here are 10 of the best DIY projects to get you started:
Also Read- Top 10 Heart-Healthy Foods to Support Your Cardiovascular Wellness … click here
10. Upcycle Old T-Shirts:
- Concept: Give new life to old t-shirts by transforming them into tote bags, pillowcases, or other useful items.
- Why it’s great:
- Reduces waste: Prevents old t-shirts from ending up in landfills.
- Creative and fun: A simple and satisfying way to repurpose old clothes.
- Custom and unique: Create one-of-a-kind items that reflect your personal style.
- Tips:
- Choose sturdy fabrics: Select t-shirts made from durable materials like cotton or jersey.
- Use a sewing machine or hand-sew: Choose the method that best suits your skill level and the project.
- Get creative with design: Add embellishments like embroidery, appliqués, or tie-dye patterns.

Upcycling Old T-Shirts: A Guide
Upcycling old t-shirts is a fantastic way to reduce waste and unleash your creativity. Here are some popular and easy-to-make projects:
1. No-Sew T-Shirt Tote Bags:
- What you’ll need:
- Old t-shirt
- Scissors
- Ruler or measuring tape
- Optional: Fabric markers, iron-on patches, or fabric paint
- Instructions:
- Cut the t-shirt: Cut off the sleeves and the neckline.
- Create the bag bottom: Cut a straight line across the bottom of the t-shirt to form the base of the bag.
- Make the handles: Cut two long strips from the bottom hem of the t-shirt for the handles.
- Decorate (optional): Add your own unique touch with fabric markers, iron-on patches, or fabric paint.

2. T-Shirt Pillowcases:
- What you’ll need:
- Old t-shirt
- Sewing machine or needle and thread
- Scissors
- Pins
- Pillow insert
- Instructions:
- Cut the t-shirt: Cut off the sleeves and the neckline. Cut the remaining fabric in half lengthwise.
- Hem the edges: Hem the raw edges of the fabric to prevent fraying.
- Sew the pillowcase: Sew the two long sides of the fabric together to form a pillowcase.
- Insert the pillow: Insert the pillow insert into the pillowcase.

3. Braided T-Shirt Rug:
- What you’ll need:
- Several old t-shirts
- Scissors
- Ruler or measuring tape
- Needle and strong thread
- Instructions:
- Cut t-shirt strips: Cut the t-shirts into long, even strips.
- Braid the strips: Braid the strips together tightly.
- Sew the braid: Sew the braided strips together to create a rug.
- Add a backing: Attach a non-slip backing to the bottom of the rug.

4. T-Shirt Hair Ties:
- What you’ll need:
- Old t-shirt
- Scissors
- Instructions:
- Cut strips: Cut the t-shirt into long, thin strips.
- Fold and sew: Fold the strips in half lengthwise and sew the edges together.
- Cut into desired length: Cut the sewn strips into desired lengths for hair ties.

Tips for Upcycling T-Shirts:
- Choose sturdy fabrics: Select t-shirts made from durable materials like cotton or jersey.
- Wash and dry before upcycling: Wash and dry the t-shirts to remove any dirt or stains.
- Get creative with designs: Experiment with different colors, patterns, and embellishments.
- Have fun! Upcycling should be a fun and enjoyable process.
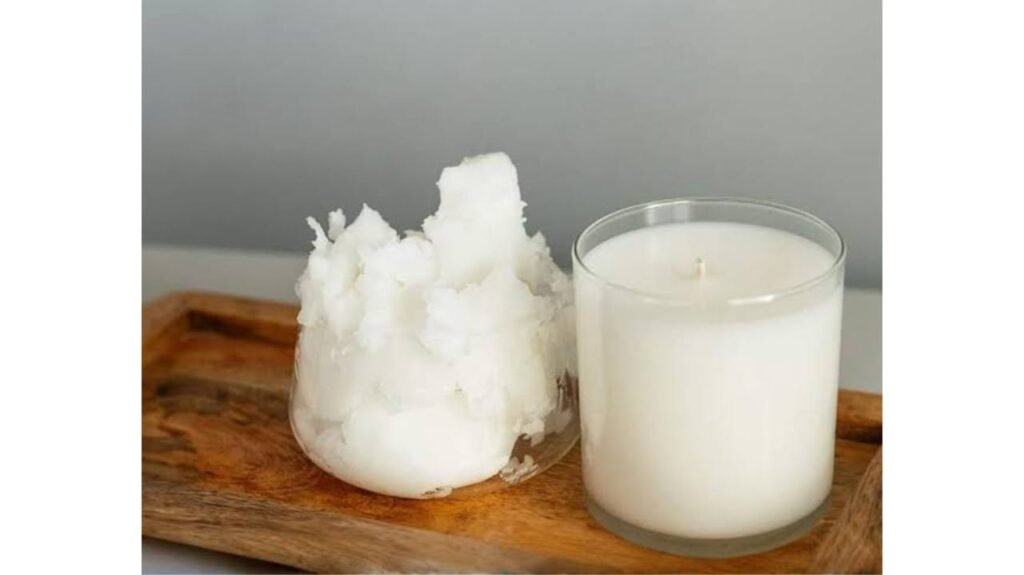
9. Make Your Own Candles:
- Concept: Create custom-scented candles using wax, wicks, and essential oils.
- Why it’s great:
- Personalized scents: Create unique scents that reflect your personal preferences.
- Cost-effective: Often more affordable than purchasing ready-made candles.
- Fun and creative: A relaxing and enjoyable hobby.
- Tips:
- Choose the right type of wax: Select a wax that is appropriate for container candles or pillar candles.
- Use high-quality wicks: Choose wicks that are the correct size for your container and wax type.
- Experiment with scents: Combine different essential oils to create unique and complex aromas.
Making Your Own Candles: A Step-by-Step Guide
Creating your own candles is a rewarding and creative DIY project. You can customize scents, colors, and even the containers to match your personal style. Here’s a basic guide to get you started:

1. Gather Your Supplies:
- Wax:
- Soy wax: Popular choice, burns cleanly, and is environmentally friendly.
- Beeswax: Natural and produces a pleasant honey-like scent.
- Paraffin wax: Affordable and widely available, but may release some toxins when burned.
- Wicks: Choose wicks specifically designed for the type of wax you’re using.
- Containers: Glass jars, tins, or specialized candle molds.
- Scent: Essential oils or fragrance oils.
- Double boiler or heat-safe pot and bowl: For melting wax safely.
- Thermometer: To monitor wax temperature.
- Stirring utensils: Wooden spoons or chopsticks.
- Wick stickers or glue dots: To secure wicks to the bottom of containers.
- Optional: Dye blocks or liquid dye for coloring your candles.
2. Prepare Your Workspace:
- Choose a well-ventilated area: Candle-making can produce fumes.
- Protect your work surface: Use newspaper or a silicone mat to catch any spills.
3. Prepare Your Containers:
- Clean thoroughly: Wash and dry your containers completely.
- Secure the wicks: Attach wick stickers or glue dots to the bottom of each container and center the wicks.
4. Melt the Wax:
- Use a double boiler: This is the safest method. Fill the bottom pot with water and place the top pot containing the wax over it.
- Heat gently: Gradually increase heat and stir occasionally until the wax is completely melted.
- Monitor temperature: Use a thermometer to ensure the wax doesn’t overheat.
5. Add Scent and Color (Optional):
- Add fragrance oil: Follow the recommended amount for your chosen wax.
- Add dye: If using, add a small amount of dye to the melted wax and stir well until evenly distributed.
6. Pour the Wax:
- Slowly pour the wax: Pour the melted wax evenly into each container.
- Leave space at the top: Leave about 1/2 inch of space at the top to allow for expansion as the wax cools.
7. Center the Wicks:
- Gently center the wicks: As the wax begins to cool, gently center the wicks using a toothpick or pencil.
8. Cool and Cure:
- Allow to cool: Let the candles cool completely at room temperature. This may take several hours or even overnight.
- Cure the candles: After cooling, allow the candles to cure for several days or even weeks. Curing allows the wax to harden and the scent to fully develop.
Tips for Success:
- Use a double boiler: This is the safest method for melting wax.
- Avoid overheating the wax: Overheating can cause the wax to discolor or become brittle.
- Experiment with scents: Try different essential oils and fragrance oils to create unique and personalized scents.
- Get creative with containers: Use unique containers such as teacups, mason jars, or even seashells.
- Start with simple designs: Begin with basic designs and gradually increase complexity as you gain experience.
Safety Precautions:
- Never leave melting wax unattended.
- Keep children and pets away from the work area.
- Work in a well-ventilated area.
- Use caution when handling hot wax.
Enjoy your homemade candles!
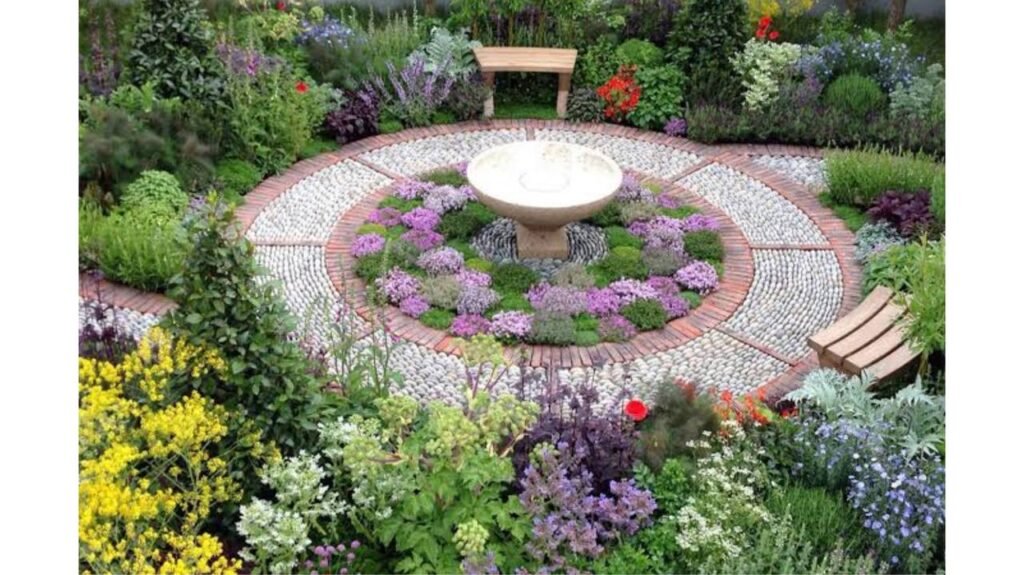
8. Create a Herb Garden:
- Concept: Grow your own herbs at home in containers, window boxes, or a dedicated garden bed.
- Why it’s great:
- Fresh herbs on demand: Enjoy the taste and aroma of fresh herbs in your cooking.
- Adds beauty to your home: Creates a visually appealing and fragrant addition to your indoor or outdoor space.
- Easy to maintain: Many herbs are relatively low-maintenance and easy to grow.
- Tips:
- Choose the right location: Select a location that receives adequate sunlight.
- Use well-draining soil: Ensure your plants have proper drainage to prevent root rot.
- Water regularly: Water your herbs consistently, but avoid overwatering.
Creating a Herb Garden: A Step-by-Step Guide
Growing your own herbs is a rewarding experience. You get to enjoy the fresh flavors and aromas while adding a touch of greenery to your home. Here’s a guide to help you create a thriving herb garden:
1. Choose Your Location and Method
- Sunlight: Most herbs thrive in full sun (at least 6 hours of direct sunlight per day). Consider a sunny windowsill, balcony, or a dedicated spot in your garden.
- Space: Determine the size of your herb garden based on the available space and the number of herbs you want to grow.
- Growing Methods:
- Containers: Ideal for balconies, patios, or limited space. Choose pots with drainage holes.
- Raised Beds: Offer excellent drainage and can be easily customized.
- In-Ground Garden: Suitable for larger spaces.
2. Select Your Herbs
- Choose herbs you love to use: Consider your culinary preferences and how often you cook with herbs.
- Start with easy-to-grow varieties: Beginners can try basil, chives, mint, parsley, and oregano.
- Consider your climate: Some herbs are better suited for specific climates.
3. Prepare Your Soil
- Use well-draining soil: Avoid heavy clay soil, which can retain too much water.
- Amend the soil: Mix in compost or other organic matter to improve drainage and add nutrients.
- For containers: Use a high-quality potting mix specifically designed for herbs.
4. Plant Your Herbs
- Follow planting instructions: Space plants according to their specific needs.
- Water gently after planting: Avoid overwatering, which can lead to root rot.
5. Provide Proper Care
- Water regularly: Water deeply and consistently, but avoid overwatering. Check the soil moisture regularly.
- Fertilize occasionally: Use a balanced liquid fertilizer or compost tea to provide nutrients.
- Prune regularly: Pinch back or cut back plants to encourage bushier growth and prevent them from flowering.
- Protect from pests: Monitor for pests and diseases, and take appropriate action if necessary.
6. Harvest and Enjoy!
- Harvest herbs at the right time: Harvest herbs in the morning after the dew has dried.
- Use fresh herbs immediately or store them properly: Store fresh herbs in the refrigerator in a plastic bag or wrap them in a damp paper towel.
Tips for Success
- Start small: Begin with a few easy-to-grow herbs and gradually expand your garden.
- Observe your plants: Pay attention to their growth and adjust your care accordingly.
- Have fun! Enjoy the process of growing your own herbs and the satisfaction of using fresh produce in your cooking.
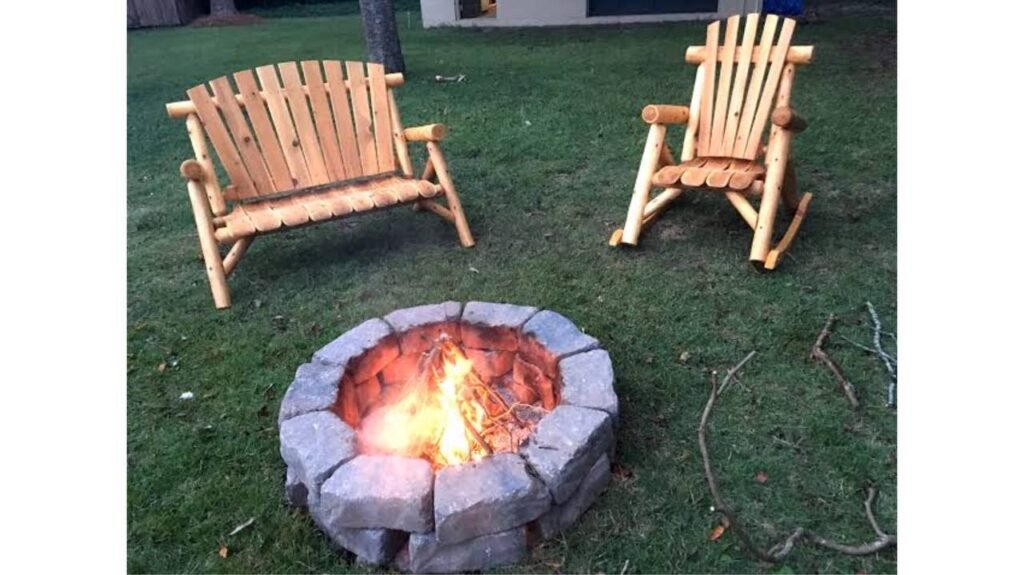
7. Build a Custom Fire Pit:
- Concept: Create a focal point for outdoor gatherings with a DIY fire pit.
- Why it’s great:
- Perfect for entertaining: Ideal for backyard barbecues, campfires, and cozy evenings with friends and family.
- Adds value to your outdoor space: Creates a relaxing and inviting atmosphere.
- A rewarding challenge: A fulfilling project that allows you to develop your construction skills.
- Tips:
- Choose the right materials: Select fire-resistant materials such as brick, stone, or metal.
- Ensure proper safety precautions: Follow local fire safety guidelines and maintain a safe distance from flammable materials.
- Add decorative touches: Personalize your fire pit with decorative stones, mosaic tiles, or engraved bricks.
Building a Custom Fire Pit: A Guide
Creating a custom fire pit is a rewarding DIY project that can transform your outdoor space into a cozy gathering spot. Here’s a breakdown of the process:
1. Planning and Preparation
- Design: Determine the size and shape of your fire pit. Consider the space available and the desired seating arrangement.
- Materials: Choose durable, heat-resistant materials like:
- Natural Stone: Offers a rustic, timeless look.
- Brick: Provides a classic, sturdy structure.
- Concrete Blocks: Affordable and easy to work with.
- Metal: Offers a modern, sleek look (but can get very hot).
- Safety:
- Clearance: Ensure adequate clearance from flammable materials like trees, fences, and structures.
- Local Regulations: Check local fire codes and building permits, if required.
2. Preparing the Base
- Level the Ground: Remove any sod or vegetation and level the ground where the fire pit will be located.
- Create a Base:
- For Stone or Brick: Lay a layer of compacted gravel or sand to prevent settling.
- For Concrete Blocks: You may need a more solid base, such as a small concrete slab.
3. Construction
- Lay the Foundation: Begin by laying the first course of stones or blocks, ensuring they are level.
- Build the Walls: Continue stacking the materials, staggering the joints for added stability.
- Create a Fire Ring: If using a metal fire ring, insert it into the center of the pit.
- Fill the Interior: Add a layer of fire-resistant material like lava rock or sand to the bottom of the pit.
4. Finishing Touches
- Decorate: Personalize your fire pit with decorative stones, mosaic tiles, or engraved bricks.
- Seating Area: Create a comfortable seating area around the fire pit with chairs, benches, or outdoor cushions.
Tips for Success
- Plan Carefully: Create a detailed plan and gather all necessary materials before you begin.
- Safety First: Wear appropriate safety gear, such as gloves and safety glasses.
- Work with a Helper: Having an extra set of hands can make the construction process easier and faster.
- Enjoy the Process: Take your time and enjoy the creative process of building your own fire pit.
By following these guidelines, you can create a beautiful and functional fire pit that will provide many hours of enjoyment for you and your family.
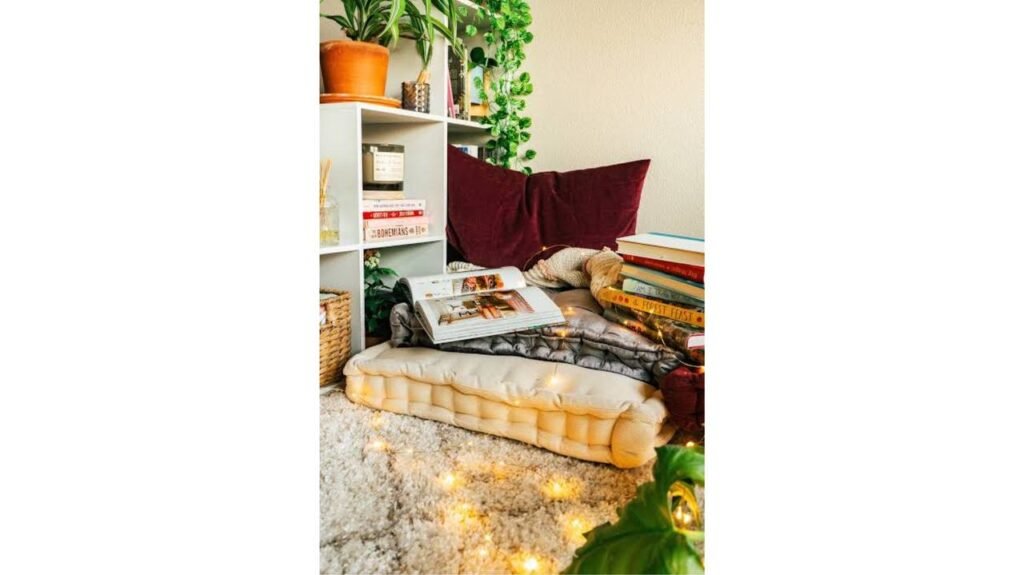
6. DIY a Cozy Reading Nook:
- Concept: Create a dedicated space for reading and relaxation in your home.
- Why it’s great:
- Creates a peaceful retreat: Provides a dedicated space to escape from the hustle and bustle of daily life.
- Encourages reading: Makes reading more enjoyable and inviting.
- Adds personality to your home: Creates a cozy and inviting atmosphere.
- Tips:
- Find a quiet corner: Choose a location that is free from distractions.
- Add comfortable seating: Invest in a cozy armchair or a plush reading pillow.
- Incorporate soft lighting: Use a floor lamp, string lights, or a table lamp to create a warm and inviting ambiance.
DIY a Cozy Reading Nook
Creating a cozy reading nook is a fantastic way to transform a corner of your home into a peaceful retreat. Here’s a breakdown of how to DIY your own:
1. Choose the Perfect Spot
- Natural Light: Ideally, your nook should have access to plenty of natural light. A window seat or a corner near a window is perfect.
- Quiet and Secluded: Find a spot away from high-traffic areas and noise distractions.
- Consider Space: Even a small corner can be transformed into a cozy reading nook.
2. Comfortable Seating is Key
- Armchair: A comfortable armchair is essential. Consider a plush armchair with supportive back cushions.
- Reading Chair: Explore options like wingback chairs, recliners, or even a bean bag chair for ultimate relaxation.
- Add Cushions and Throws: Layer on cozy pillows and a soft throw blanket for extra comfort.
3. Lighting is Crucial
- Natural Light: Maximize natural light by keeping windows clean and unobstructed.
- Reading Lamp: A good reading lamp is a must-have. Choose a lamp with adjustable brightness and a flexible arm.
- Ambient Lighting: Consider adding soft ambient lighting with string lights or fairy lights to create a warm and inviting atmosphere.
4. Bookshelves and Storage
- Shelves: Built-in shelves or freestanding bookcases can add character and provide ample storage for your book collection.
- Side Table: A small side table can hold a lamp, a cup of tea, and other reading essentials.
- Storage Ottoman: An ottoman with built-in storage can hold extra blankets, books, or magazines.
5. Add Personal Touches
- Decorative Elements: Incorporate personal touches like artwork, plants, or decorative pillows.
- Rugs: A cozy rug can define the space and add warmth to the floor.
- Textiles: Layer on textures with curtains, throws, and pillows in a variety of fabrics.
Tips for Creating a Cozy Atmosphere:
- Soft Colors: Choose soft, calming colors for the walls and decor.
- Textured Elements: Incorporate textured elements like woven baskets, sheepskin rugs, or macrame wall hangings.
- Aromatherapy: Add a touch of aromatherapy with essential oil diffusers or scented candles.
- Sound: Play calming music or nature sounds to enhance the relaxing ambiance.
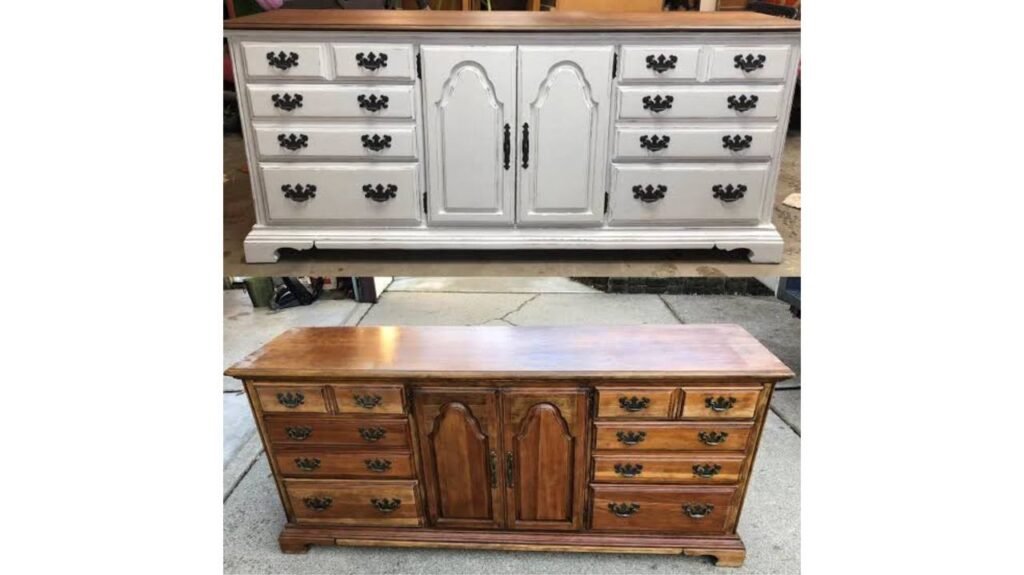
5. Refurbish Old Furniture:
- Concept: Give new life to old furniture by refinishing it with paint, stain, or a new fabric.
- Why it’s great:
- Sustainable: Prevents furniture from ending up in landfills.
- Unique: Creates one-of-a-kind pieces that reflect your personal style.
- Cost-effective: Often more affordable than buying new furniture.
- Tips:
- Clean and prepare the surface: Remove any old finishes and ensure the surface is smooth and clean.
- Choose the right finish: Select a paint or stain that is appropriate for the type of wood and your desired look.
- Protect your finish: Apply a clear coat to protect your paint or stain from wear and tear.
Refurbishing old furniture is a rewarding DIY project that can breathe new life into worn-out pieces and add unique character to your home. Here’s a breakdown of the process:
1. Choosing a Piece:
- Consider the “bones”: Look for sturdy construction and good quality materials.
- Assess the damage: Determine the extent of repairs needed (scratches, chips, loose joints).
- Visualize the transformation: Imagine the piece’s potential and how it will fit into your decor.
2. Preparing the Surface:
- Clean thoroughly: Remove dust, grime, and any old wax or polish. Use a mild soap and water solution.
- Strip old finishes: If necessary, remove old paint or varnish using chemical strippers or sanding.
- Chemical Strippers: Wear protective gear and follow safety instructions carefully.
- Sanding: Start with coarser grit sandpaper and gradually move to finer grits to achieve a smooth surface.
- Repair any damage: Fill cracks and holes with wood filler.
3. Choosing a Finish:
- Paint:
- Pros: Easy to apply, wide range of colors and finishes (matte, glossy, chalk paint).
- Cons: Can hide the natural wood grain.
- Stain:
- Pros: Enhances the natural wood grain, provides a more natural look.
- Cons: Requires careful application to achieve an even finish.
4. Applying the Finish:
- Paint:
- Prime the surface: Apply a primer to ensure even paint coverage and prevent the wood grain from showing through.
- Apply multiple thin coats: Allow each coat to dry completely before applying the next.
- Stain:
- Apply stain evenly: Use a brush or rag to apply stain in the direction of the wood grain.
- Wipe off excess stain: Remove any excess stain with a clean cloth.
- Apply a protective topcoat: Seal the stain with a clear coat of polyurethane or varnish.
5. Adding Finishing Touches:
- New hardware: Replace old knobs, handles, and hinges with new ones.
- Upholstery: Reupholster chairs or add new cushions.
- Decorative elements: Add decorative elements like stencils, decoupage, or distressing techniques.
Tips for Success:
- Patience is key: Refurbishing furniture takes time and effort. Don’t rush the process.
- Proper ventilation: Work in a well-ventilated area when using chemicals or applying finishes.
- Protect your workspace: Cover your work area with drop cloths to prevent spills and damage.
- Practice on scrap wood: Experiment with different techniques and finishes on scrap wood before applying them to your furniture piece.
- Have fun! Enjoy the process and the satisfaction of creating something unique and beautiful.
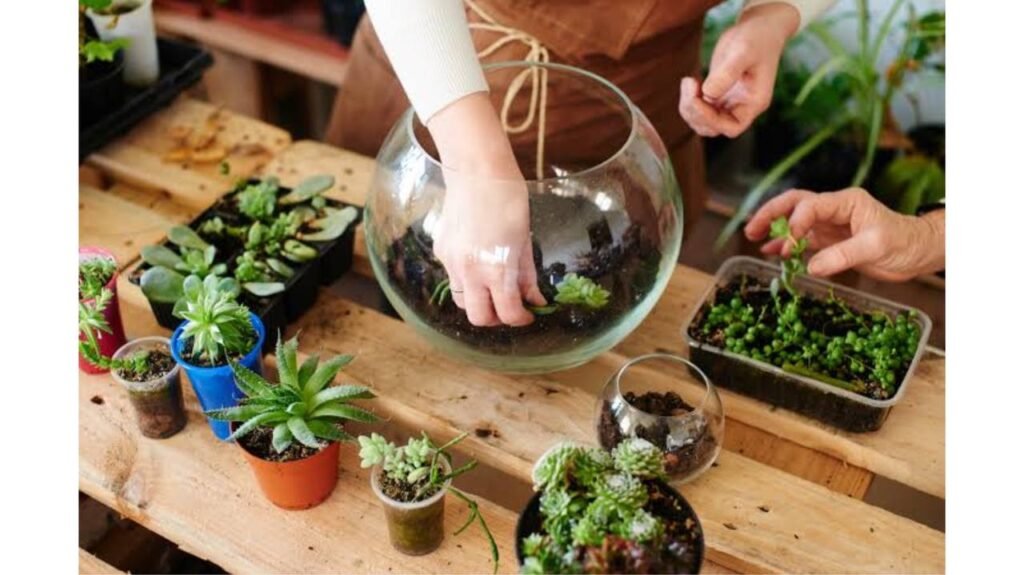
4. Make Your Own Terrarium:
- Concept: Create a miniature ecosystem in a glass container, featuring plants, soil, and decorative elements.
- Why it’s great:
- Relaxing and therapeutic: The process of creating and maintaining a terrarium can be very calming.
- Low-maintenance: Many terrariums require minimal watering and care.
- Adds natural beauty: Brings a touch of nature indoors.
- Tips:
- Choose the right plants: Select plants that thrive in low-light conditions and high humidity.
- Create proper drainage: Ensure your container has adequate drainage to prevent root rot.
- Get creative with design: Experiment with different plant combinations, decorative rocks, and other elements.
Making Your Own Terrarium: A Step-by-Step Guide
Terrariums are miniature gardens enclosed in glass containers, creating a self-sustaining ecosystem. They’re a fantastic DIY project that brings a touch of nature indoors and can be a rewarding hobby. Here’s a guide to help you create your own:
1. Gather Your Materials:
- Container: Choose a glass container with no drainage holes, such as a fishbowl, a jar, or a terrarium-specific vessel.
- Gravel or small stones: For drainage.
- Activated charcoal: Helps filter the water and prevent mold.
- Potting mix: A well-draining mix specifically for terrariums is ideal.
- Plants: Select plants that thrive in humid environments and low light, such as:
- Ferns: Boston fern, maidenhair fern
- Mosses: Various types of moss
- Small foliage plants: Fittonia, Peperomia, Selaginella
- Decorative elements (optional): Small rocks, shells, figurines
2. Prepare the Container:
- Thoroughly clean the container with soap and water.
- Add a layer of gravel or small stones to the bottom for drainage.
- Top the gravel with a layer of activated charcoal.
3. Add Potting Mix:
- Fill the container with potting mix, leaving enough space for your plants.
4. Plant Your Selections:
- Carefully remove the plants from their pots.
- Gently loosen the roots if they are root-bound.
- Create small holes in the potting mix and plant your chosen plants.
- Arrange them aesthetically, considering height and color variations.
5. Add Decorative Elements (Optional):
- Incorporate small rocks, shells, or figurines to enhance the visual appeal of your terrarium.
6. Water and Seal (If Applicable):
- Gently mist the plants with water using a spray bottle.
- If your container has a lid, seal it tightly.
7. Place and Maintain:
- Place your terrarium in a location with bright, indirect light.
- Avoid direct sunlight, which can overheat the container.
- Monitor the moisture levels. If condensation forms on the sides, you may need to open the lid for a short period to allow excess moisture to escape.
- Occasionally mist the plants with water as needed.
Tips for Success:
- Choose the right plants: Select plants with similar moisture and light requirements.
- Don’t overwater: Overwatering can lead to root rot.
- Maintain proper ventilation: If using a closed container, ensure adequate air circulation.
- Be patient: It may take some time for your terrarium to establish a balanced ecosystem.
Enjoy Your Creation!
Creating a terrarium is a rewarding experience that allows you to connect with nature and cultivate a miniature ecosystem. With a little care and attention, your terrarium will thrive and bring beauty to your home for years to come.
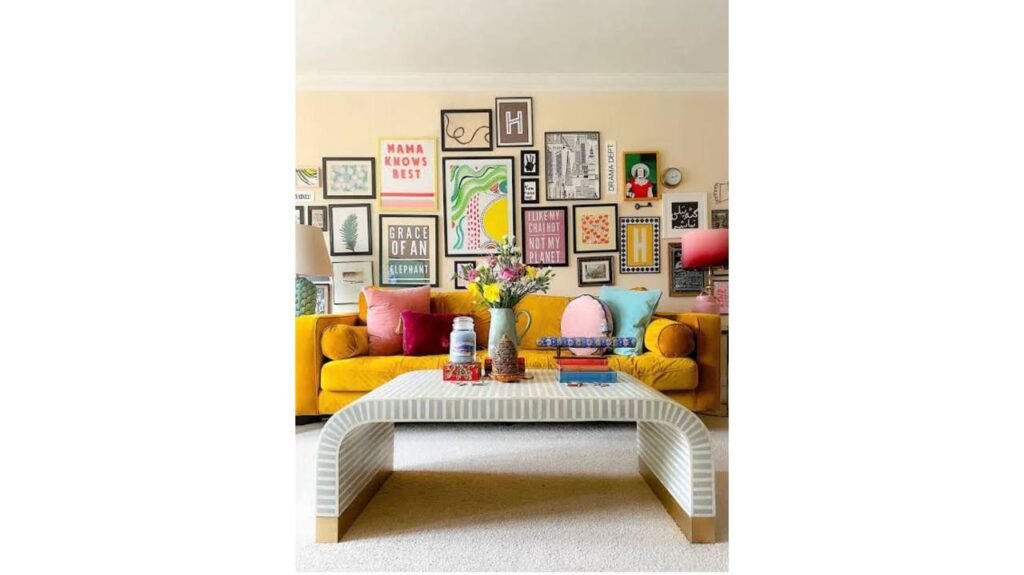
3. Create a Stunning Gallery Wall:
- Concept: Arrange a collection of artwork, photos, and decorative items to create a visually appealing focal point in your home.
- Why it’s great:
- Personal and expressive: Tells your story and reflects your interests.
- Affordable: Can be created with a mix of purchased and DIY artwork.
- Versatile: Can be adapted to any room and style.
- Tips:
- Plan your layout: Use painter’s tape to create a template on the wall before hanging anything.
- Mix and match sizes and frames: Create visual interest with a variety of shapes and sizes.
- Add personal touches: Incorporate family photos, children’s artwork, or meaningful souvenirs.
Creating a Stunning Gallery Wall: A Step-by-Step Guide
A gallery wall is a fantastic way to personalize your space and showcase your unique style. Here’s a breakdown of how to create a stunning one:
1. Choose Your Space and Theme
- Consider the space: Select a wall with ample space, good lighting, and minimal distractions.
- Define a theme: This could be based on color, subject matter (family photos, travel souvenirs, art), or a specific style (modern, rustic, bohemian).
2. Curate Your Collection
- Gather your pieces: This could include framed photos, artwork, mirrors, decorative plates, or even small sculptures.
- Mix and match: Vary sizes, shapes, and textures to create visual interest.
- Consider a focal point: Choose a larger piece or a cluster of items to anchor the arrangement.
3. Plan Your Layout
- Create a template: Use painter’s tape on the floor to arrange your pieces in different configurations.
- Take photos: Photograph each layout to help you visualize how it will look on the wall.
- Consider the flow: Ensure the arrangement feels balanced and inviting.
4. Hang Your Pieces
- Use a level: Ensure each piece is hung straight and level.
- Start with the center: Hang the focal point first, then build around it.
- Adjust as needed: Don’t be afraid to make adjustments until you achieve the desired look.
5. Add Finishing Touches
- Step back and admire: Take a few steps back to assess the overall effect.
- Make adjustments: Fine-tune the arrangement by moving pieces slightly.
- Add decorative elements: Incorporate small plants, shelves, or other decorative items to enhance the display.
Tips for a Stunning Gallery Wall:
- Play with scale: Mix large and small pieces to create visual interest.
- Embrace negative space: Don’t overcrowd the wall. Leave some space between pieces to allow them to breathe.
- Use a consistent color palette: This will create a cohesive and polished look.
- Don’t be afraid to experiment: Try different arrangements until you find one that you love.
Key Takeaways:
- Planning is key: Take the time to plan your layout and choose your pieces carefully.
- Embrace your personal style: Let your gallery wall reflect your unique personality and interests.
- Have fun! The process of creating a gallery wall should be enjoyable.
By following these tips, you can create a stunning gallery wall that will be the envy of your friends and family.
2. Build a Custom Bookshelf:
- Concept: Design and construct a bookshelf that perfectly fits your space and storage needs.
- Why it’s great:
- Tailored to your space: Solve storage challenges and maximize space utilization.
- Showcases your style: Choose materials and design to reflect your personal aesthetic.
- A rewarding challenge: A fulfilling project that allows you to develop woodworking skills.
- Tips:
- Plan carefully: Create detailed blueprints and consider the weight and size of your books.
- Start with a simple design: Begin with a basic shelf design and gradually increase complexity.
- Use quality materials: Invest in durable wood and sturdy hardware.
Building a Custom Bookshelf: A Deeper Dive
Building a custom bookshelf is a rewarding DIY project that allows you to create a unique and functional piece of furniture tailored to your exact needs and style. Here’s a more detailed look at the process:
1. Planning and Design
- Measure Your Space: Carefully measure the available space where you plan to place the bookshelf. Consider factors like height, width, and depth.
- Determine Shelf Spacing: Decide on the number of shelves and their spacing. Consider the size of your books and any other items you plan to store.
- Choose Materials: Select wood that is suitable for your project. Popular choices include:
- Pine: Affordable and easy to work with, but may not be as durable as hardwoods.
- Oak: Strong, durable, and adds a classic touch.
- Maple: Hard, dense, and resistant to wear and tear.
- Plywood: A good option for shelves, as it is strong and less prone to warping.
- Consider Style: Decide on the overall style of your bookshelf. Will it be modern, rustic, minimalist, or something else? This will guide your material and design choices.
- Create a Blueprint: Draw a detailed plan of your bookshelf, including dimensions, shelf spacing, and any special features.
2. Gathering Tools and Materials
- Tools:
- Measuring tape: For accurate measurements.
- Pencil and ruler: For marking and drawing.
- Saw: A circular saw or miter saw for cutting wood.
- Drill: For drilling pilot holes and attaching hardware.
- Screwdriver: For driving screws.
- Sandpaper: For smoothing edges and surfaces.
- Clamps: For holding pieces together while gluing or attaching hardware.
- Level: For ensuring shelves are level.
- Safety glasses and gloves: For personal protection.
- Materials:
- Wood (boards, plywood)
- Wood glue
- Screws or nails
- Sandpaper (various grits)
- Wood filler (optional)
- Stain or paint (optional)
- Finishing touches (hardware, decorative elements)
3. Cutting and Assembly
- Cut the Wood: Using your measurements and blueprint, cut the wood for the sides, shelves, top, and bottom of your bookshelf.
- Assemble the Frame: Attach the sides to the top and bottom pieces using wood glue and screws.
- Install Shelves: Attach shelf supports to the sides, then insert and secure the shelves.
- Attach Back Panel (optional): If desired, attach a back panel to the bookshelf for added stability and a finished look.
4. Finishing Touches
- Sanding: Sand all surfaces of the bookshelf to smooth any rough edges and prepare for finishing.
- Finishing: Stain or paint the bookshelf according to your desired look. Apply multiple coats as needed and allow for proper drying time between coats.
- Add Hardware: Install any decorative hardware, such as drawer pulls or decorative brackets.
Tips for Success:
- Plan carefully: Take the time to plan your project thoroughly to avoid mistakes.
- Measure twice, cut once: Ensure all your measurements are accurate before cutting any wood.
- Use quality materials: Invest in high-quality wood and hardware for a durable and long-lasting bookshelf.
- Take your time: Don’t rush the process. Allow ample drying time for glue and finish.
- Enjoy the process: Building a bookshelf is a rewarding experience. Take pride in your work and enjoy the satisfaction of creating something unique and functional.

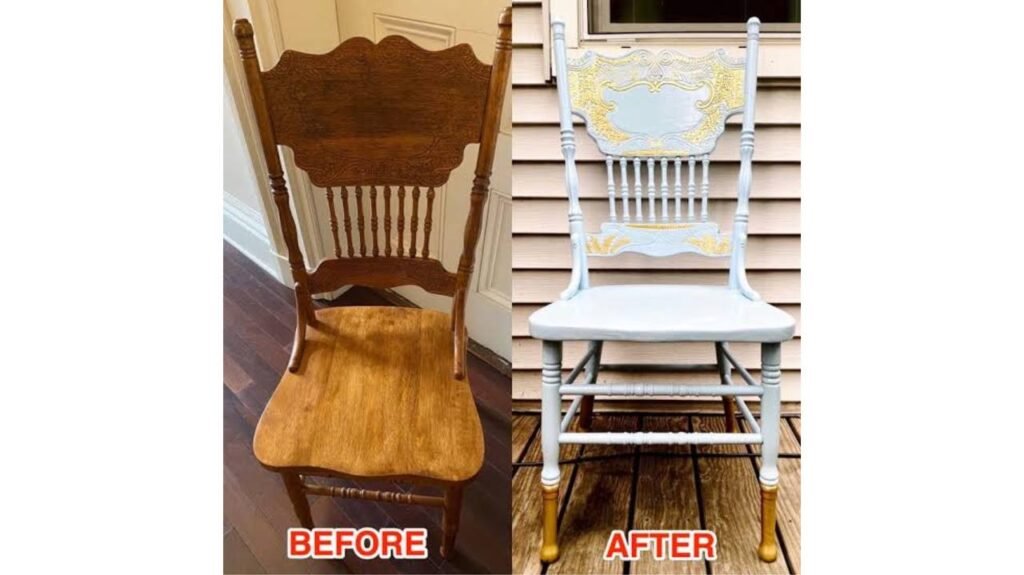
1. Upcycle Old Furniture:
- Concept: Give new life to old furniture with a fresh coat of paint, new hardware, or a creative upholstery makeover.
- Why it’s great:
- Sustainable: Reduces waste and minimizes your environmental impact.
- Budget-friendly: Often cheaper than buying new furniture.
- Unique: Creates one-of-a-kind pieces that reflect your personal style.
- Tips:
- Choose a piece with good bones: Look for sturdy frames and solid construction.
- Sand and prep properly: Ensure a smooth and even finish for your paint or stain.
- Get creative with color and texture: Experiment with different paint techniques, fabrics, and hardware.
Upcycling Old Furniture
Upcycling old furniture is a fantastic way to breathe new life into tired pieces and add unique character to your home. It’s a sustainable and budget-friendly alternative to buying new, and it allows you to express your creativity. Here’s a deeper dive into this rewarding DIY project:
Why Upcycle?
- Environmental Benefits: Reduces waste by keeping furniture out of landfills.
- Cost-Effectiveness: Often more affordable than purchasing new furniture.
- Unique Creations: Creates one-of-a-kind pieces that reflect your personal style.
- Sense of Accomplishment: The satisfaction of transforming something old into something new.
Popular Upcycling Techniques:
- Painting: A classic technique! Choose from a wide range of paints, such as chalk paint, milk paint, and regular latex paint. Experiment with different colors, finishes (matte, glossy, distressed), and painting techniques like stencilling or distressing.
- Refinishing: Strip away old finishes like varnish or paint to reveal the natural wood grain. You can then stain the wood in a variety of colors to achieve the desired look.
- Upholstery: Reupholstering chairs, sofas, and other upholstered furniture can completely transform their appearance. Choose new fabrics that complement your style and add a touch of personality.
- Hardware Swap: Replacing old, outdated hardware like knobs, pulls, and hinges can make a dramatic difference. Explore options like antique brass, modern chrome, or colorful ceramic.
- Decoupage: Add a decorative touch by applying paper, fabric, or other materials to the surface of the furniture.
Tips for Success:
- Choose the Right Piece: Select furniture with good bones – sturdy frames and solid construction.
- Prepare the Surface: Thoroughly clean the furniture and remove any old finishes. Sand the surface to ensure a smooth finish for paint or stain.
- Plan Your Design: Consider the overall style of your home and how the upcycled piece will fit in.
- Gather Your Supplies: Make sure you have all the necessary tools and materials before you begin.
- Take Your Time: Don’t rush the process. Enjoy the journey and allow yourself time to experiment and create.
Inspiration:
- Transform an old dresser into a stylish bathroom vanity.
- Reupholster vintage dining chairs with colorful fabric.
- Paint a wooden crate and use it as a nightstand or plant stand.
- Turn an old ladder into a unique bookshelf or towel rack.
- **Create a one-of-a-kind coffee table by adding a glass top to an old wooden crate.
Upcycling old furniture is a rewarding and creative endeavor that allows you to express your individuality and contribute to a more sustainable lifestyle. So, get started today and discover the joy of transforming something old into something beautiful!
Remember, the best DIY projects are the ones that you enjoy the most. Don’t be afraid to experiment, try new things, and let your creativity shine!
Disclaimer: This information is for general knowledge and informational purposes only and does not constitute professional advice.
FAQs
1. What are some of the easiest DIY projects for beginners?
For beginners, simple DIY projects that require minimal tools and materials are ideal. Some great options include:
Personalized photo frames: Customize frames with paint, fabric, or decorations.
Homemade candles: Make scented or decorative candles with basic supplies.
Macramé plant hangers: Learn basic knots to create trendy plant hangers.
Wooden coasters: Use wood slices or cork to make functional and decorative coasters. These projects are easy to follow, require basic crafting supplies, and yield beautiful results, perfect for someone just starting out in DIY.
2. Can DIY projects be budget-friendly?
Yes, DIY projects can definitely be budget-friendly! Many projects use inexpensive materials or repurpose items you already have at home. For example:
Upcycling old furniture: Give new life to old furniture with paint or fabric without breaking the bank.
Recycled craft projects: Use cardboard, glass jars, or fabric scraps to create unique decor or storage solutions.
Simple home decor: Create artwork, wall hangings, or photo displays using affordable materials like paper, string, or wood. There are many DIY projects that are both fun and affordable, helping you enhance your home without spending much.
3. How do I ensure my DIY project turns out well?
To ensure your DIY project turns out great, here are some tips:
Plan ahead: Gather all materials and instructions before starting.
Follow step-by-step instructions: Whether it’s a video tutorial or a written guide, stick to the steps to avoid mistakes.
Start with easy projects: If you’re a beginner, choose simple projects with fewer steps.
Take your time: Don’t rush; give yourself time to complete the project and make adjustments if needed.
Use the right tools: Ensure you have the necessary tools for the job, whether it’s a basic glue gun or a power drill.
4. What are some DIY projects I can do for home decor?
Home decor DIY projects are a great way to personalize your space. Some popular ideas include:
Customized wall art: Create canvas prints, framed prints, or even DIY photo collages.
Decorative throw pillows: Sew or personalize your own pillows using fabric paint, embroidery, or upcycled fabric.
Rustic wood shelves: Build floating shelves using reclaimed wood for a rustic look.
DIY lighting: Create a unique pendant light or lamp using wire, string lights, or mason jars. These projects allow you to add your personal touch to your home while saving money on expensive decor.
5. How can DIY projects help me develop new skills?
DIY projects are an excellent way to develop new skills, such as:
Crafting and artistic abilities: DIY projects help hone skills like painting, sewing, and drawing.
Problem-solving: Many DIY tasks require creative thinking to come up with solutions.
Handywork skills: Home improvement and woodworking projects teach skills like sanding, drilling, and assembling.
Organization and time management: Working through DIY projects helps improve your ability to plan and execute tasks efficiently. By taking on different projects, you’ll gain practical skills that can be useful in daily life, as well as boost your confidence in tackling more advanced tasks.
